The complexity of the process is medium-high, but affordable with some basic knowledge, and takes about 2 or 3 hours of work
The approximate cost in parts for the replacement of the cylinder and piston, plus their gaskets, is around €500
Trial bikes are simple bikes, with few electronics and relatively easy to maintain with basic knowledge of
mechanics
. However, there are tasks that require greater complexity, either because of the number of elements to be disassembled and replaced, or because of the precision involved in their assembly.
One of the most feared
mechanical trial operations
on a 2-stroke is the replacement of the cylinder and piston. First, it is important to detect when it is necessary to consider this operation so that the work is not in vain.
The explanatory video with the whole process is at the end of the report
MAIN CAUSES OF CYLINDER AND PISTON REPLACEMENT
1) We want to change the displacement of our trial bike
2) We need to repair a trial bike with a seizure
3) The compression is low and the bike has lost power
DISPLACEMENT CHANGE ON A TRIAL BIKE
This is the case that has motivated us to make this mechanics tutorial. Either if you decide to
buy a new trial
bike and have subsequently regretted the displacement, or because your bike is old and has started to lose performance, the procedure is identical.
We got down to work with a
2017 Gas Gas TXT Racing
that was originally 280cc and prepared the move to 250cc.
First of all, logically it is to buy the entire
replacement for a Gas Gas TXT PRO
and start with the process.

WHAT PARTS DO I NEED AND HOW MUCH DO THEY COST?
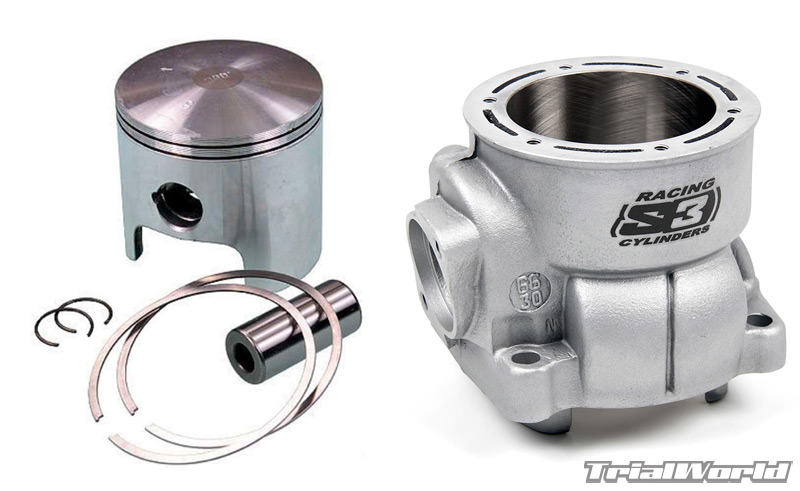
Cylinder and complete piston: price 430€
Piston only option, in this one the
Gas Gas TXT Pro 125 piston: 120,7
€
Piston only option, in this one the Gas Gas TXT Pro 250 piston: 149,4€
Stock: price 63€
Copper gasket and washer kit: price 20€
BPR5ES spark plug:
price 6€
CYLINDER AND PISTON REPLACEMENT STEP BY STEP
Once we have all the elements to start the process, we will make sure that the bike is properly cleaned. We will put it on a stand that allows us to work with the bike in a straight position, resting on the skid plate.
Next, we will begin the operation by disassembling all the body elements until the cylinder and piston assembly is completely removed, maintaining the discipline that the steps follow the following order (taking into account that the steps are marked on a Gas
Gas TXT Racing 2017
):
1) Remove the fuel tank and the air filter box.
2) Disassemble the exhaust manifold by removing the two screws that connect it to the cylinder.
3) Remove the spark plug.
4) Remove the cylinder tie rod to the chassis.
5) Empty the cooling system and remove the sleeves that reach the cylinder, previously releasing the clamps.
6) Loosen the four screws that attach the cylinder to the engine crankcase.
7) Disassembling the radiator is optional, but recommended, as it limits the working space for disassembling the cylinder.
8) Remove the cylinder from the top.
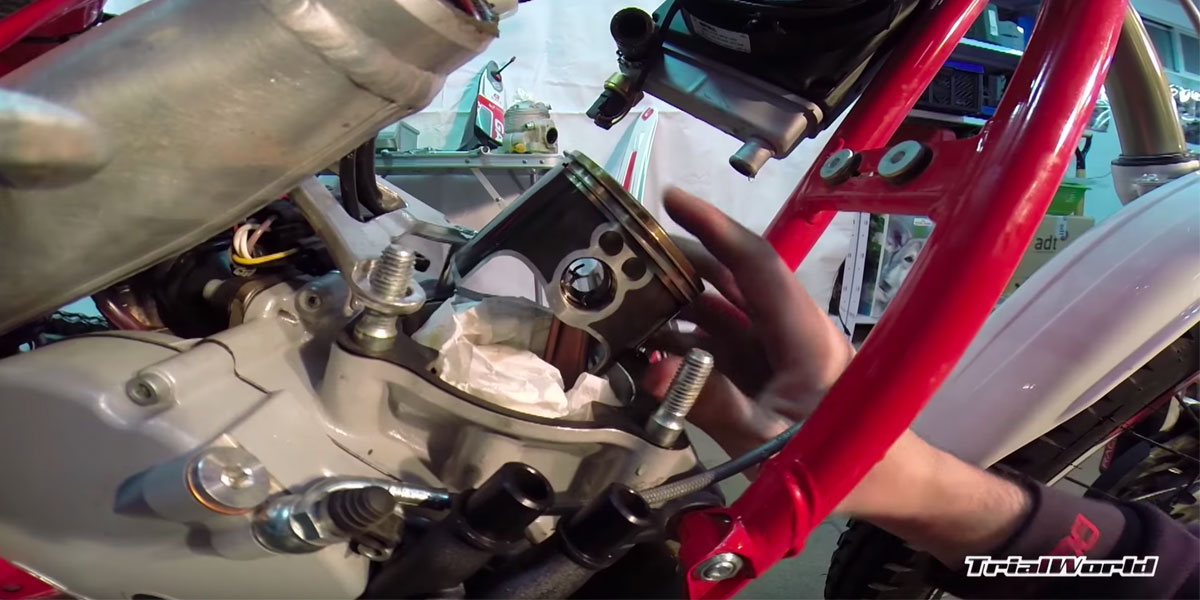
At this point the preparation work begins for the assembly of the new cylinder and piston on the bike. In the meantime, it is important to keep the area clean and ensure that no dirt enters the engine or parts fall out of the piston when dismantling. To do this, we will put paper covering all the gaps.
9) We focus on the piston. Remove one of the circlip from the pin and remove the piston from the connecting rod.
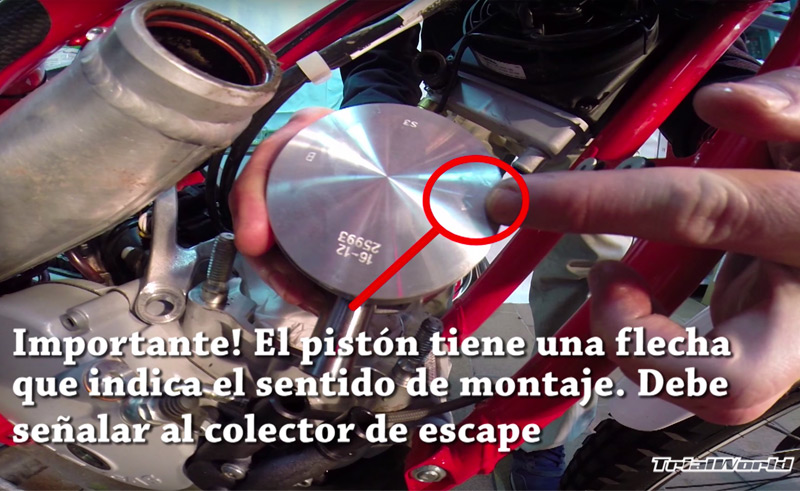
10) We proceed to the placement of the new piston. It is important to respect the mark on the top of the piston. This mark should point towards the exhaust manifold, i.e. be at the top (facing from back to front).
11) Insert the new pin and the circlip to prevent the piston from coming out.
We can now remove the paper that we have previously placed to protect the area.
12) We put the cylinder gasket, which should always be new. It is interesting to apply special joint paste in your application.
13) Move the rings over their housing, until the piston lugs are located between the ends of the rings.
14) It is time to put the O-rings on the cylinder head and proceed to screw it to the cylinder. It is advisable to replace the copper washers.
15) Apply a thin layer of oil on the inside of the cylinder to ensure the correct sliding of the piston on the cylinder without causing damage to the first piston.
16) We will press the rings to facilitate the insertion of the cylinder into the piston.
17) Tighten the screws that connect the cylinder to the engine crankcase. First we bring the screws closer together and finally we tighten them crosswise, that is, at opposite ends.
18) Reassemble the radiator, replace the hoses and fill with antifreeze.
19) We place the spark plug, exhaust manifold, filter box and fuel tank.
20) Once you’re in place, you can change the oil on the bike.
By following these steps with discipline and taking care, after a couple of hours of work you will have the new cylinder and piston mounted on your trial bike.
Obviously, it is advisable to be careful on the first tank of fuel and do a minimum break-in. Basically, the precaution is to try not to exceed the first third of the throttle and make sure that the bike works at the correct temperature.
It is also important to check that there are no coolant leaks.
We hope that this
tutorial on trial mechanics
has been useful to you. Don’t forget to comment on any questions or opinions in case we can be of help.