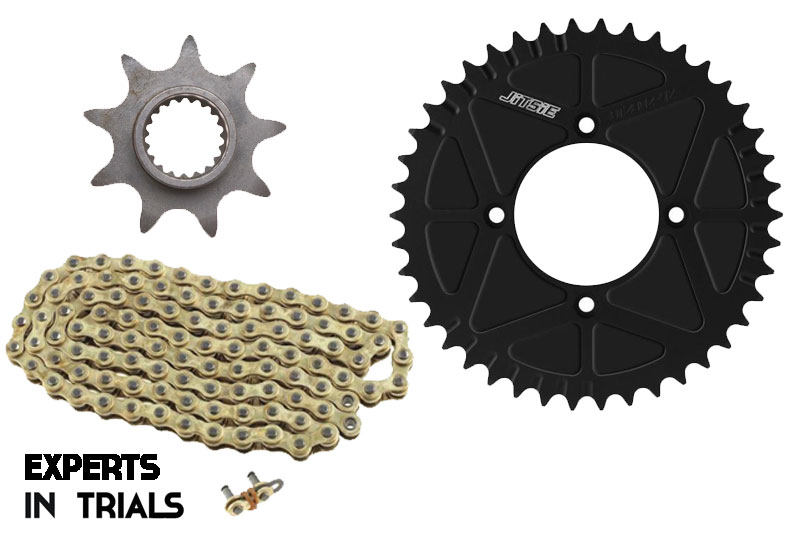
The transmission kit is another key element in the performance of the trial bike. Perhaps it is not so easy to interpret it in sensations at the controls of the bike, but when the tension of the chain and the wear is in the right margins, the precision and response of the engine is infinitely better.
The transmission kit consists of the crown, chain and drive sprocket. The usual thing is to maintain the original gear ratio of the bike, but by modifying the teeth of either of the two components we can shorten or lengthen the gearing.
If we shorten the gearing, for example by putting more teeth in the crown, the gears will be shorter. And vice versa, with a smaller crown, the development is lengthened. In this case the bike has more speed, but you lose bass. Therefore, it is ideal to play one or two crown teeth, at most.

WHEN SHOULD THE TRANSMISSION KIT BE CHANGED?
There are several symptoms that warn us of transmission kit fatigue.
1.- When the eccentrics of the rear axle are tensioned to the maximum (knowing that the chain tensioner must keep a distance of 2-3 centimeters from the swingarm)
2.- Looking at the crown and pinion, checking if the teeth are rounded, which is a symptom of excessive wear.
3.- If any of the three elements (sprocket, crown or chain) need to be replaced, it is always best to do so at the same time. A faulty chain can damage a new crown, and vice versa.
HOW DO YOU CHANGE THE TRANSMISSION KIT ON THE TRIAL BIKE?
It is a relatively simple task and the estimated time is between 20 and 30 minutes.
Tools needed: pliers, screwdriver, allen wrench set, fixed wrench set (usually 13mm.) and screw fixer.
Products: crown for trial bikes (you must select the number of teeth), attack sprocket for trial bikes (you must select the number of teeth and model of your bike) and chain for trial bikes (standard, pitch of 520). All these products are available in the
motor and electric section of the Trialworld Store
.
Attack sprocket for Gas Gas, Vertigo and TRS (2016 and 2017)
Attack sprocket for Sherco and Scorpa
Attack sprocket for TRS (since 2018)
Attack sprocket for Montesa Cota 4RT
Attack sprocket for Beta EVO, Techno and Rev3
As an aside, crowns must be closed (without internal openings) in most regional and national championships. It’s a safety measure. A standard crown can also be mounted with this adhesive approved for trial crowns.
For maintenance, a
special brush for motorcycle chains
and
chain grease for off-road motorcycles
is recommended.
DISMANTLING PROCESS
The first thing is to remove the rear wheel and release it from the swingarm. Once on the ground, with the help of the Allen and fixed wrenches, we dismantled the rear sprocket. It is important that the force is made with the fixed wrench, not with the Allen, in order to prevent the screw from being rounded.
Then we disassemble the chain. You will see that one of the links has a small crane that, once released, allows you to open the chain and remove it from its rail. Reserve or reattach the
connecting link for trial chains.
Let’s go with the attack sprocket. Here you will see that in front of the sprocket there is a small group, which is released by opening it, that is, making the reverse set of a standard pliers. Once this groupage is removed, the attack sprocket comes out of the shaft.
ASSEMBLY PROCESS
For the assembly process , the reverse operation must be done. We place the new sprocket with its corresponding crane (the same one that we have disassembled before) is valid, we proceed to place the chain and join it with the link (be careful, the crane that closes the chain must have the side open in the opposite direction to the direction of rotation, that is, facing backwards). The new crown is placed on the hub with its screws and nuts, and it is advisable to put screw fixer at the end of the screw. Finally, the tightening will be done on the fixed wrench (nut) to avoid rounding the Allen head of the screw.
We put the wheel in place and finish by tensioning the eccentrics to the point indicated above, that is, leaving between 2 and 3 centimeters between the chain guide and the swingarm.
With this simple operation we will have our new transmission kit on the trial bike.